Hey guys, it's Jhoanna and it's a new quarter meaning a new project. Our new project is called Low Poly Portraits. So far the beginning of the project I'm kinda like I don't really wanna do this but usually my opinion will change by the end. Anyway besides what I feel about the project lets talk about facial expressions and how they are or aren't universal. My opinion on this is that I don't think they are universal but at the same do believe they are. I don't believe it being is that sometimes everyone has a different facial features and it might be hard to detect their expressions. But at the same time you can detect someone facial expressions easily.

So we did this project two ways. The first way is a symmetrical photo we that we took in PhotoBooth. The other way we did this is that we took a self portrait and a portrait of someone else which I did of my brother. The first step for the symmetrical one is obviously taking the photo then putting that in PhotoShop. But before putting it in PhotoShop you make a new document. Then you drop your picture you took of yourself. Then you would turn on your grid. Go to View>Show>Grid, if that doesn't work out then press command+quotations on your keyboard. Then you would try your best to make it symmetrical. The command+J to copy and make another layer. Using the Line Tool make a red line in the middle and then outline one side of your face in your new layer. Then you would start making triangles all over your face. After thats completed you would use the Lasso Tool ( L ) to start filling them in. So you would select it the go Filter>Blur>Average. You just keep doing that over and over again. Then when your done you would command+j to make a new layer. You use your move tool and move it to the other side while pressing down shift. To make your outline white you would use color overlay. Thats how we created Poly 1.

The other one we did is using my brother. This one was much more easier then the other. You would do the same steps but your wouldn't outline it or make it symmetrical. Make a new layer first and then you would just start making triangles using Lasso Tool ( L ). To fill them in press I on your keyboard to select a color and then alt+delete to fill in. You would keep doing that until your done. Then you go to Layer>Adjustments>Curves>Custom. Then you would go and make a new layer of your photo and cut that out. To make your background you would go to Filter>Cutout>Custom. Then Image>Color Balance>Custom. After that your done or you can make it a little bit brighter or darker by going Image>Brightness>Contrast. Thats how we created Poly 2 which is a little bit faster and easier then Poly 1.
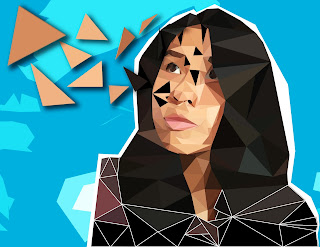
Poly 1 and Poly 2 were both fun and stressful to make. For Poly 1 we outlined and used a the blur filter while on Poly 2 we didn't outline and was able to choose the color we wanted for that triangle. On Poly 2 we had to do our background while on Poly 1 it was only our face. Some things that were the same is that our shapes had to be triangles and only triangles. For the out come of my low-poly 2 is that one looked better than low-poly 1. Low-poly 1 is that I messed up on that one. You can really see my nose and the fact that its me. Probably due to the fact that I didn't use my time wisely and that I didn't focus to details. While on low-poly 2 I focus more on details and I did use my time wisely making enough triangles for that area of the face/body. Overall I wished I could do better on the low-poly 1 but I am proud of the work I did for my low-poly 2.


No comments:
Post a Comment